July 31, 2008
Well, I veered away from what was in the book on this one. I hammered out the star in the middle, then I punched out the circles around the perimeter thinking I would weave copper mesh through the wholes going around the outside of the star. Well trying to weave the mesh wasn’t working so well. So I improvised and just secured the copper mesh between the two pieces, so the mesh would show through the circles. I then used small 1/16” brads to secure the whole thing together and added a pin bail on the back. So I can wear it as a pin or add a chain and wear it as a necklace.
The photo that was added in the star is just a random photo I picked.
In my spare time, who needs to sleep. I also worked on making 12 of these charms for Amber Dawn’s Think Pink Charm Exchange. I went back to my soldering for this one.
Then packaged each one up in this envelope tied with pink ribbon.
Moving on to the next project in the book.
July 24, 2008
Using the different metals I have, I came up with these earrings. Again it took some time since they are earrings and they have to be even, at least for me. So I would work on one and then while working on the second I would hold it up at different points to make sure they remained even.
The brads I used to hold the pieces together are little stars that I hammered flat.
This is starting to be quite the collection of jewelry I am making.
Working my way through more projects.
July 21, 2008
This project called for using 26 gauge sheet metal. I used 24 gauge sheet metal, which I had on hand, it is thicker and took a little longer to manipulate and bend. It turned out Ok. Again I went with Copper in copper.
When I put in my next order of sheet metal, I will be getting some 26 gauge. This was a fun project and would like to do more of them, of course trying it with the 26 gauge.
On to the next project.
July 17, 2008
I had fun doing this project from Deryn's jewelry challenge. I already have ideas to do smaller charm size pieces for this sheet metal charm swap I’m in.
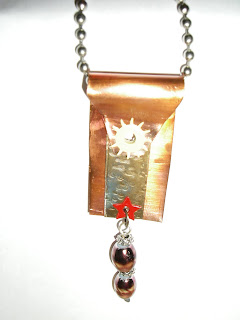
I used copper as the base and added a layer of silver with a little texture and heat patina. Pulled out my array of eyelets that I have. Added the sun at the top and a star at the bottom to hook my dangling beads from. I drew a bead on the wire to make a head pin to hold the beads.
I did find out one thing while working on this piece. My crop-a-dile tool (hand punch) is able to punch through a sheet of metal. Then I used it to set my eyelets.
Gotta get working on more of the projects so I can continue to share them with you.
July 16, 2008
I’ve been a busy bee. First I want to share with you a bezel I made for Stephanie Lee’s birthday. Back in May I was lucky enough to take a couple classes with her. In the conversations she mentioned her birth date and that she likes the number 7. So I made this 7 bezel then stamped the number 7 all over the inside. I used my handy dandy bench grinder to smooth the edges.
Sent off my charms for the Summer time bird swap I am in with my group the Charmsters. I used some photos I took of Eagles when I was on my trip in Alaska. Used up some of my glass bubble stash. If you love making charms of any sort. This group is accepting new members by invite, so leave me a comment and a link to your blog and I will contact you. The group is growing fast, we are now at 90+ members up from 75.
I also spent some time using resin. Making a slue of these molded creations with sea shells and beads. They will become charms, key chains and other items to trade at Art and Soul this October. 11 weeks and counting.
One last photo. Last night this was the view from my front yard. The moon shining bright as clouds pass over it.
Until next time, enjoy creating.
July 15, 2008
So this one I did a couple different ones. My first one I liked So so. When I finished with the second one I liked it more. Though I love these techniques and will be working on more like these in the future.
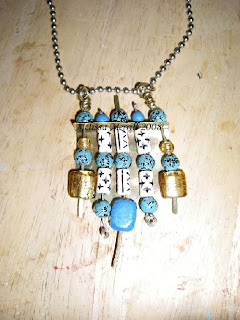
I used Brass sheet metal and wire. With a mixture of different beads on each.
With the second one the sheet metal was a thinner piece so I was able to use some decorative scissors for the bottom edge.
I also was able to complete project 4, but more on that later.
thanks for visiting.
July 09, 2008
Visited my local Tap Plastics store a week or so ago to pick up some acrylic rods for a project out of Sally Jeans “Pretty Little Things” book. I was in here earlier this year and picked up my resin and acrylic tubes for some charm and pendant ideas for Art and Soul trades. I wondered around the store, of course in any store there is always that light bulb that goes off when I am looking around. So I came away with some acrylic sheets as well. I had some time to work on a couple of creations.
The first is some earrings with wire and beads.
The second took a little more time. Only because I put the wire through the button holes and secured before I added the spacers and wire at the corners. So I had to undo what I did. Learn as you go.
I am starting to like working with Plexiglas. It is a great medium to work with. There is so much that can be done with it. I have only scratched the surface.
Still working on the project from Sally's book. Something to go with my Tiara.
Enjoy, let me know what you think.
July 08, 2008
With this Project I wanted the folding to be precise. Since it was earrings I was making, there are two of them. I didn’t want them to be lopsided when I wear them. The drawing a bead is fun. Though I found out that if you are trying for a larger bead be careful as the heated piece may just fall off, then you’d be back to square one. Only with a shorter piece of wire. It takes some practice.
So this is what I came up with for the Peek a Boo Wrapped Earrings. Working with what I had on hand, copper pieces, I put these together.
For some reason I like the look of Green with Copper. So I put these beads dangling inside. There is a little twist in the bead that gives it a little something.
July 07, 2008
So know that I am all caught up with my swaps and other tasks. I got to do a lot of playing, creating, this holiday weekend. It’s amazing what a difference that extra day makes.
I have wanted to participate and get started on the jewelry challenge that Deryn Medtock is having this summer. It is taking the projects/techniques from Mary Hettmansperger’s new book Wrap, Stitch, Fold and Rivit and making them your own.
So over this weekend I was able to work on the first project “Stacked Spinner Necklace”. This is what I created using most of the techniques.
Front View
Side View
Keep watching for more projects.
July 02, 2008
I’m sure everyone out there who heads to those greeting card isles at the stores have noticed the high cost of a single card
I noticed that my stash of cards is running low, so I planed on blocking out some time to work on making more to have on hand. I then ran across Heather Simpson-Bluhm’s blog and she is having a Summer Greeting card swap. How Great is that, such prefect timing. So if you too are into making your own handmade cards head on over to her blog and read more about the swap.
For the past several years my friend Leah and I get together and work on making our Holiday cards. We start in October usually since with the holiday cards we have a large number to send out at one time. Though it also is taking the time to come up with the layout of your card. Putting too much thought into it really strains the brain sometimes.
Here are some random cards I have made in the past.
I was in my using rubber stamps phase.
I have also decorated this lunch box size tin, using Alcohol Inks, which will house my cards just nicely.
happy Creating to everyone.
July 01, 2008
By my friend Laurel
Here are the rules:
2. Post it on your blog.
Now, who to tag….Michelle C, Alison, Cindy, Cheryl and Michelle G.
A couple none related photos to share. Look what happens when I do nothing to this rose bush in my front yard. Though a few years ago I did cut them way back to the ground. They just keep coming back.